How SharePoint Professionals Can Use Power BI for Dynamic Reporting
You want your SharePoint data to help you more. Power BI lets you change lists and libraries into dashboards. These dashboards are easy for everyone to use. If you lead teams, look at data, or help others, you get many benefits. Here is what you get:
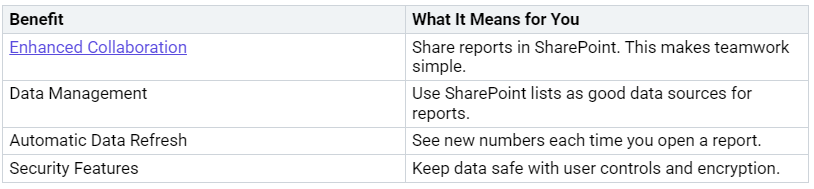
Key Takeaways
Power BI changes SharePoint data into dashboards you can click on. This helps teams work together and make smart choices.
Data updates by itself, so your reports are always current. You will always see the newest information right away.
Power BI has security tools that keep your data safe. You can choose who can see things and protect private details.
Getting your SharePoint data ready is very important. Clean and neat data makes reports and ideas better.
Putting Power BI reports in SharePoint makes them easy to find. Your team can look at and use reports without leaving SharePoint.
Power BI Integration
Overview
You can link Power BI with SharePoint. This helps you make your data easy to see and use. It works with SharePoint Online and older versions like SharePoint 2013 and 2016. If you use SharePoint Server 2016, you need Microsoft SQL Server 2016 RTM. You also need Power Pivot or Power View add-ins. For SharePoint Server 2013, you need SQL Server 2012 SP1 or SQL Server 2014 (64-bit). SharePoint Online works well with Office 365 apps. You can use Outlook Online, Word Online, and Excel Online with your reports.
Tip: Check that your SharePoint has App Management and User Profile service applications. These services help Power BI work better with SharePoint.
Benefits
This integration gives you lots of benefits. It does not matter what your job is. Managers, analysts, power users, and SharePoint admins all get new ways to see data. Teams in IT, marketing, finance, and sales can share ideas and make choices more easily.
You can make dashboards that update by themselves.
You keep your data safe with user controls.
You save time because you do not move data by hand.
You can use Office 365 tools with your reports for better teamwork.
Use Cases
There are many ways to use Power BI with SharePoint. Here are some common examples:
Make dashboards from SharePoint lists to watch projects or sales.
Do quick checks to answer questions about your data.
Set up workflows by linking reports to alerts or tasks.
Share reports in SharePoint so your team sees the newest numbers.
Note: Plan your integration to avoid problems like slow reports or permission issues.
Getting Started
Prerequisites
You do not need to be a data expert to start. You just need the right tools and access. Here is a simple checklist to help you get ready:
Download Power BI Desktop from the official website.
Install it on your computer.
Make sure you have access to your company’s SharePoint site.
Create or use a SharePoint list, like a custom list for tracking students or projects.
Open Power BI Desktop and sign in with your work account.
Use the “Get Data” feature to connect to your SharePoint list.
Enter your SharePoint site URL and sign in when asked.
Pick the list you want and load it into Power BI Desktop.
“To download Power BI Desktop, go to the Power BI Desktop download page and select Download Free.”
If you are new, start by exploring your data and trying out simple visualizations. You will learn as you go.
Licensing
You need a license to share and collaborate on your reports. Here is a quick look at your options:
Pick the license that fits your team’s size and needs. Most people start with Power BI Pro.
Security
Keeping your data safe is important. Power BI uses strong security features to protect your information.
All data traffic uses encryption (TLS 1.2 or higher).
You can set up Role-Level Security (RLS) to control who sees what data.
Use data classification and sensitivity labels to tag important content.
Limit data export and sharing to prevent leaks.
If you follow these steps, you will keep your data secure and your team safe.
Connect SharePoint Data
Prepare Data
Getting your SharePoint data ready is the first step. You want your lists and files to be clean and easy to use. Start by checking your SharePoint list. Make sure the columns have clear names and the data types match what you need. If you use Excel files, format your data as tables. This helps Power BI read your data without problems.
Here’s a quick look at the best ways to prepare your data:
You save time by skipping big document libraries.
You make things easy for everyone, even if they’re new.
You get data that matches your source exactly.
Tip: Always check your SharePoint list for errors or missing values before you import. Clean data means better reports.
Import to Power BI
Now you’re ready to bring your SharePoint data into Power BI. You have a few ways to do this, and each one is simple.
Importing a SharePoint List:
Open Power BI Desktop.
Go to the Home tab and select Get Data.
Search for SharePoint and choose SharePoint List.
Enter your SharePoint site URL.
Pick the list you want and click Load.
Importing with OData Feed:
Open Power BI Desktop.
Click Get Data, then choose OData Feed.
Type your SharePoint OData Feed URL (it looks like
http://siteurl/_vti_bin/listdata.svc
).Select your list in the Navigator dialog.
Click Load to bring in your data.
Once you load your data, you’ll see your fields in the Fields section. You can start building your report right away.
Note: Use Power BI’s query editor to filter out rows and columns you don’t need. This keeps your report fast and focused.
Data Refresh
You want your reports to show the latest numbers. Setting up data refresh is easy and keeps your dashboards up to date.
Schedule refreshes when your team isn’t busy. This avoids slowing down your system.
Check your refresh history often. This helps you catch problems early.
Use DirectQuery or LiveConnect if your data changes a lot.
For big lists, try incremental refresh. This only updates new or changed data.
Limit the tables and columns you use. This makes your reports run faster.
Pro Tip: Automate your data refresh with Power Automate. This reduces manual work and keeps your data accurate.
Make sure your SharePoint permissions match your Power BI settings. This keeps your data safe and makes sure only the right people see your reports.
Build Dynamic Reports
Visualizations
You want your reports to stand out. Visualizations help you turn numbers into pictures. You can use charts, graphs, maps, and cards. Each one tells a different story. When you build a dashboard, pick visuals that match your data. For example, use a bar chart to compare sales across months. Try a pie chart to show how much each department spends.
Here are some tips for making your visuals pop:
Choose colors that are easy to see.
Add labels so everyone knows what the chart shows.
Use tooltips to give extra details when someone hovers over a point.
Keep your dashboard simple. Too many visuals can confuse people.
Tip: Start with one or two visuals. See what works best for your team. You can always add more later.
Filters and Slicers
Filters and slicers make your reports interactive. You can focus on the data that matters most. Slicers let you pick dates, categories, or people. When you use a slicer, every chart on your dashboard changes at once. Filters work on single visuals or the whole page. You can zoom in on one project or see results for a single team.
Slicers help you filter data across many visuals at the same time.
Filters let you look at just one part of your data.
You can explore data hierarchies with slicers. Drill down from year to month to day.
Filters give you targeted analysis. You find answers fast.
Note: Filters and slicers help SharePoint users get precise insights. You control what you see, so you make better decisions.
Data Modeling
Data modeling shapes how your report works. You want your data to be clean and easy to use. Good modeling makes your dashboard fast and reliable. Here are some top techniques:
Pro Tip: Use hierarchies to help users explore data. They can start with a big picture and drill down to details.
When you set up your model, think about what your team needs. Clean data and smart design make your Power BI reports easy to use and quick to load.
Share and Embed Reports
Publish to Power BI Service
You have finished your report and want to share it with your team. Publishing to the Power BI Service is the first step. This makes your report available online and ready for sharing or embedding.
Here’s how you can do it:
Open your report in Power BI Desktop.
Go to the Home tab and select “Publish.”
Choose the “Publish to SharePoint” option.
Pick your SharePoint site and the document library where you want the report.
Click “Publish” to upload your report.
Make sure your report looks good and works well before you publish. Clean visuals and strong data connections help everyone understand your story.
You should also check that you have the right permissions for your SharePoint site. This keeps your publishing process smooth.
Embed in SharePoint
Now you want your team to see the report right inside SharePoint. You can embed your report on a SharePoint page so everyone can interact with it.
Follow these steps:
Create or open the SharePoint page where you want the report.
Edit the page and add a web part.
Select the Power BI web part.
Enter the URL of your published report.
Apply the changes and save the page.
You can also use the “Embed in SharePoint Online” feature. Copy the link from your report, add a Power BI component to your SharePoint page, and paste the link. Publish the page, and your team will see the live, interactive report.
Tip: Embedding reports in SharePoint helps your team stay in one place. No need to switch between apps!
Manage Access
You want only the right people to see your reports. Managing access is important for security and privacy.
Here’s a simple way to control who sees your embedded report:
Create a security group for your team in the Microsoft 365 Admin Center.
Make a new SharePoint page just for the report.
Change the page permissions. Stop inheriting permissions, remove everyone, and add your security group.
Set permissions in Power BI so only your group can view the report.
Test with a user from your group to make sure access works.
Always check both SharePoint and report permissions. This double-check keeps your data safe and private.
Best Practices
Performance
You want your reports to be fast and smooth. Keep your data model neat and simple. Take out columns or rows you do not need. If your data is big, use DirectQuery or Live Connection. These help your report get only the data you need. This makes things faster.
Do not put too many visuals on one page. Too many charts or tables can slow it down. Use filters and slicers to show only the most important data. This keeps your report quick and easy to use. Try the Performance Analyzer tool in Power BI. It shows what makes your report slow so you can fix it.
Put all your data in one place. This makes reports easier to handle and keeps your numbers right.
Troubleshooting
Sometimes reports do not work right. Maybe a report is slow or does not connect. First, check your data connections. Make sure your SharePoint lists or files are still there. If you see errors, refresh your data or reload the report.
Check for permission problems. If someone cannot see a report, check their access in SharePoint and Power BI. Use Performance Analyzer to find slow visuals. Remove or make simple any visuals that take too long. If you need help, ask your team or look online for answers.
Tip: Test your reports with a few users before sharing with everyone.
Maintenance
Keep your reports working well by checking them often. Look at the Message center for any planned work. If you see a notice, refresh your browser after the work is done. Update your Power BI Mobile app and log in again to stop problems.
If you change or publish reports, reimport any organizational visuals or get the newest PBIX files. Sometimes, you need to make new embedded links if old ones stop working. Download your activity logs before any maintenance so you do not lose important data.
Keep your apps updated.
Refresh your data often.
Check permissions and access regularly.
Good maintenance keeps your reports working well and your team happy.
You have seen how easy it is to turn SharePoint data into dynamic reports. Here are the top benefits you get:
You do not need to be an expert to start. Try Power BI and see how it helps your team. If you want to learn more, check out LinkedIn Learning or Microsoft’s guided learning. You can also join online user groups for support. Reach out to experts for help or schedule a free demo. Data-driven choices will help you and your team grow.
FAQ
How do I connect Power BI to my SharePoint list?
You just open Power BI Desktop, click “Get Data,” and pick SharePoint List. Enter your SharePoint site URL, then choose your list. Power BI loads your data so you can start building reports.
Can I refresh my Power BI report with new SharePoint data?
Yes! You can set up automatic data refresh in the Power BI Service. Your report will always show the latest numbers from your SharePoint list.
Who can see my Power BI reports in SharePoint?
You control access. Only people with the right permissions in both SharePoint and Power BI can view your reports. Always check your settings before sharing.
Do I need a Power BI Pro license to share reports?
Yes, you need a Power BI Pro license to share and collaborate on reports with others. If your team needs advanced features, try Power BI Premium Per User.