


How to Import SharePoint Files into Power BI with Power Query

Importing SharePoint Files into Power BI becomes straightforward when you use Power Query. You gain the ability to automate repetitive data cleaning tasks, such as removing duplicates or filtering, which reduces manual effort and errors. Power Query lets you refresh your data workflow with a single click. You can import both individual files and entire folders, combining them into a unified dataset efficiently.
Key Takeaways
Use Power Query to easily import and automate cleaning of SharePoint files, saving time and reducing errors.
Choose the right connector: SharePoint.Files scans all files for broad searches, while SharePoint.Contents lets you navigate folders for precise access.
Import single files via the Web connector using direct file links, and import folders by connecting to the SharePoint Folder source and filtering early.
Filter and combine files with the same structure to speed up processing and create unified datasets.
Check permissions, URLs, and authentication carefully to avoid connection issues and ensure smooth data imports.
Connector Choice
Choosing the right connector in Power Query is essential for efficient data import from SharePoint. You have two main options: SharePoint.Files and SharePoint.Contents. Each serves a different purpose and offers unique advantages depending on your needs.
SharePoint Files
When you want to scan and retrieve all files across your entire SharePoint site, SharePoint.Files is the tool you need. This function collects every file, no matter how deep it sits within nested folders. You can use it to quickly find files with specific names or extensions, such as all CSV files, even if they are scattered in different locations.
Tip: Use early filtering in Power Query to limit the number of files retrieved. This practice helps you avoid long wait times and improves performance.
You can access SharePoint.Files directly through the Power Query user interface. Simply select "SharePoint Folder" as your data source, then enter your site URL. Power Query will automatically use SharePoint.Files behind the scenes. If you want to filter files by folder or type, you can do so in the query editor.
SharePoint Files works well for scenarios where you need to:
Gather all files of a certain type from multiple folders.
Search for files based on naming patterns.
Combine data from many files into a single dataset.
Performance between SharePoint.Files and SharePoint.Contents remains similar if you apply filters early in your query. This approach prevents Power Query from scanning every file, which can slow down your workflow if your SharePoint site contains thousands of documents.
You may encounter reliability issues in some environments, such as Microsoft Fabric Dataflow, where automatic removal of binary content columns can disrupt queries. Disabling staging often resolves this problem. However, these cases are rare and usually relate to specific platform settings.
SharePoint Contents
SharePoint.Contents gives you a different way to access your data. Instead of scanning every file, it lets you navigate the folder structure of your SharePoint site. You start at the root and drill down into folders until you reach the files you want. This method works well when you know exactly where your data lives.
You cannot access SharePoint.Contents directly from the Power Query UI. To use it, you must enable the formula bar and enter the function manually. Remember that Power Query is case-sensitive, so type "SharePoint.Contents" with a capital "C."
SharePoint.Contents is ideal for these situations:
You want to explore folders and subfolders before selecting files.
You need to analyze folder properties, such as creation or modification dates.
You prefer to limit access to specific folders for security reasons.
Note: SharePoint.Contents requires access to the entire SharePoint site, while SharePoint.Files can work with permissions limited to a subfolder. Always check your access rights before connecting.
The performance of SharePoint.Contents often improves when you navigate directly to the folder you need. This approach reduces the amount of data Power Query must process, especially in large document libraries.
Comparison Table
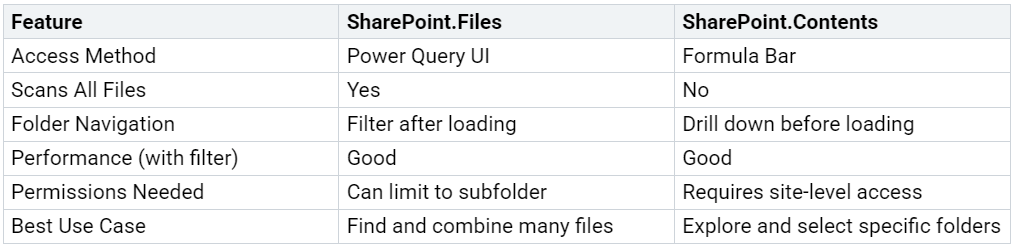
By understanding these two connectors, you can choose the best method for your project. SharePoint Files offers broad scanning power, while SharePoint.Contents provides precise navigation and control.
Import Single File
Get File Link
To import a single file from SharePoint, you first need the direct link to your document. Open your SharePoint site and locate the file you want to use. Right-click the file and select "Copy link." Make sure the link points directly to the file, not just the folder. This step ensures Power BI can access the exact file you want to analyze.
Tip: Use the file's version history and access times in SharePoint to confirm you have the most recent and relevant document. These metrics help you avoid outdated data and improve your workflow's efficiency.
Use Web Connector
After you have the file link, open Power BI Desktop and select "Get Data." Choose the "Web" connector from the list. Paste the copied SharePoint file link into the URL field. Power Query will prompt you to authenticate. Select "Organizational account" and sign in with your SharePoint credentials. This process connects Power BI directly to your SharePoint Files, allowing you to pull data from a single document.
You can monitor load times and response rates during this step. These indicators help you identify any performance issues early and optimize your data loading process.
Load Data
Once Power Query connects to your file, you will see a preview of the data. Select the table or sheet you want to import. Click "Load" to bring the data into Power BI. You can now use Power Query to clean, filter, or transform your data as needed.
SharePoint Files usage reports, such as "most viewed items" and "most active users," can provide insight into how often your file gets accessed. These statistics help you understand user engagement and collaboration efficiency.
Note: If you experience slow load times, review your SharePoint site analytics. Search analytics and metadata can reveal ways to organize files better, leading to faster data access in future imports.
Import Folder
Connect to Folder
You can import an entire folder from SharePoint into Power BI by using Power Query. Start by selecting "Get Data" in Power BI Desktop. Choose "SharePoint Folder" as your data source. Enter the site URL, not the folder path. Power Query will prompt you to sign in with your organizational account. After authentication, you will see a list of all files and folders in your SharePoint site.
Tip: For large document libraries, consider using SharePoint.Contents in the formula bar. This method lets you navigate directly to the folder you need, which improves performance and reduces load times.
Filter and Combine
Once Power Query loads the list of files, you should filter the results to focus on the folder or file type you want. Use the "Folder Path" column to select only the relevant folder. You can also filter by file extension, such as ".xlsx" or ".csv", to include only the files you need.
After filtering, you can combine files if they share the same structure. Click "Combine" in the Power Query editor. Power Query will automatically detect headers and merge the data into a single table. This step saves you time and ensures consistency across your dataset.
Early filtering reduces the amount of data Power Query processes. This practice speeds up your workflow and helps avoid performance issues, especially when working with many SharePoint Files.
Transform Data
With your files combined, you can now transform the data. Use Power Query tools to remove unnecessary columns, rename headers, or change data types. You can also apply filters or create calculated columns to prepare your data for analysis.
Note: Always review your transformations before loading the data into Power BI. Clean and well-structured data leads to more accurate reports and insights.
Troubleshooting
Connection Issues
You may encounter connection issues when importing data from SharePoint into Power BI. These problems often stem from authentication failures, expired credentials, or network restrictions. If Power Query cannot connect, first verify your organizational account credentials. Make sure your account has not expired or lost access to the SharePoint site. If you use Dynamics 365, check that Document Management is enabled and your security roles include SharePoint privileges. Refresh the SharePoint URL in your system settings by clearing and re-entering it.
If you experience slow performance or incomplete data loads, consider which connector you use. SharePoint.Files scans all files, which can slow down large sites. SharePoint.Contents lets you navigate directly to the folder you need, improving speed and reliability.
URL Problems
Incorrect URLs are a leading cause of import failures. Power Query requires the root SharePoint site URL, not a subfolder or file path.
Common URL-related errors include:
Error code 0X0201000F signals an invalid site URL. Always test the URL in your browser before using it in Power Query.
Connection failures occur when the URL is improperly formatted or points to a non-existent site.
Migration tasks fail if the target URL in a CSV file is invalid.
Site creation or update errors may result from URLs with invalid characters or those already in use.
Navigation errors arise when URLs reference unmigrated or missing SharePoint objects.
Double-check your URLs for typos, extra spaces, or missing segments. Consistent and correct URL mapping ensures smooth data imports.
Permissions
Permission issues can block access to SharePoint Files or folders. You need at least Contribute permissions on the SharePoint site to import data. Confirm your user account has the necessary rights. If you use integrated systems like Dynamics 365, ensure permissions replicate correctly between platforms.
A documented case study shows that resolving permission mismatches and using tools for permission replication can enhance document security and streamline access.
If you cannot access certain files or folders, contact your SharePoint administrator to review your permissions.
Data Tips
Navigation
Efficient navigation in Power Query helps you manage SharePoint data more effectively. You can switch from SharePoint.Files to SharePoint.Contents to see a structured view of folders and files. This approach lets you drill down through the folder hierarchy, making it easier to find the exact data you need. When you use the Content column, you can explore each folder level step by step. The Navigation step, created automatically, allows you to move through directories without losing your place.
Tip: Use the gear icon in the Navigation step to open a visual directory view. This feature simplifies locating specific files, especially in large SharePoint libraries.
Industry benchmarks highlight that native SharePoint connectors often pull all columns, including hidden ones, which can slow down performance. By navigating directly to the right folder and filtering early, you avoid unnecessary data loads and improve speed. You also enhance the user experience by creating clear drill-down paths and intuitive navigation cues.
Cleaning Data
Cleaning your data ensures accuracy and reliability in your Power BI reports. Remove unnecessary columns and filter out irrelevant rows before loading data. Rename headers to match your reporting standards. Change data types to ensure consistency across your dataset.
Use filters at the data source level to reduce the volume of imported data.
Combine files only when they share the same structure to avoid errors.
Preview your data after each transformation to catch issues early.
Note: Clean data leads to faster processing and more meaningful insights.
Refresh Best Practices
Refreshing your data keeps your reports up to date. Schedule refreshes during off-peak hours to minimize impact on performance. Host your reports and data sources in the same region to reduce latency. Limit the number of visuals and slicers on each report page to improve responsiveness.

Test your refresh schedule to ensure reliability. Monitor refresh history for errors and adjust settings as needed. Consistent refresh practices help you maintain accurate and timely data in Power BI.
You can import SharePoint Files or folders into Power BI by following a clear process: connect, filter, combine, and transform your data. These methods help you avoid common issues and achieve efficient integration. Automated scheduling and support for multiple authentication methods make your workflow reliable. Reports provide detailed insights, including file size, folder location, and modification dates.

Try both SharePoint.Files and SharePoint.Contents to find the best fit for your needs.
FAQ
How do you find the correct SharePoint site URL for Power BI?
You can open your SharePoint site in a browser. Copy the URL up to the site name, such as https://companyname.sharepoint.com/sites/sitename. Avoid including folders or file names.
Can you refresh SharePoint data automatically in Power BI?
Yes. You can schedule automatic refreshes in Power BI Service. Go to your dataset settings, set a refresh frequency, and enter your credentials. This keeps your reports up to date.
What should you do if Power Query cannot find your SharePoint file?
Check the file path and permissions. Make sure you have access to the file. Verify the URL in your browser. If the file moved or was deleted, update your link in Power Query.
Is it possible to combine files with different structures from a SharePoint folder?
You should only combine files with the same structure. Mixing different layouts can cause errors. If your files differ, filter or separate them before combining.
Which authentication method works best for SharePoint connections?
You should use "Organizational account" for most SharePoint Online sites. Enter your work credentials when prompted. This method provides secure and reliable access.