How to Level Up Your Microsoft Bicep Templates with Advanced Features
Have you ever thought about making your cloud work faster and better? Advanced features in Microsoft Bicep help you do jobs automatically. They keep your templates neat and help you not make mistakes. Simon works on the Bicep core team. He uses these features every day at his job. Here are some ways teams make their systems better:
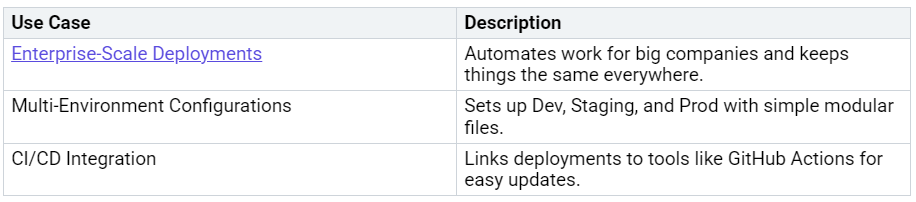
Check out these cool features and see how you can get better at using Bicep!
Key Takeaways
Use advanced features in Microsoft Bicep to help automate deployments and lower mistakes. This helps your cloud work faster and better.
Put your Bicep templates into modules. This keeps your code tidy and lets you use it again in other projects.
Set up CI/CD integration for your Bicep templates. This makes deployments automatic and checks your code before it goes live.
Use advanced parameters to make your templates more flexible and safe. Use decorators to control input values and protect private information.
Check and lint your Bicep templates often. This finds mistakes early and keeps your code quality high.
Bicep Fundamentals
Syntax Essentials
Learning Microsoft Bicep is simple if you know the basics. You want your templates to work every time. Start with these steps:
Add the Visual Studio Code extension for Bicep. It gives you tips and shows mistakes as you type.
Make a new file, like
main.bicep
, to keep things tidy.Use parameters for things that might change, like resource names. This helps your templates work in many places.
Set up resource dependencies. This tells Bicep what to build first, so nothing breaks.
These steps help you do well. You can find mistakes early and keep your code neat.
Template Structure
A good template is easy to read and change. You can make your Microsoft Bicep files better by splitting them up. Try these ideas:
Put your files into modules you can use again. This keeps your code neat and lets you use the same logic in more than one place.
Use a clear project layout. Put settings for each environment in one spot and main logic in another.
Make a main file that connects everything. This file should call your modules and use parameter files for each environment.
Tip: If you keep your files neat, it is easier to make changes later.
Common Pitfalls
Even people who use Bicep a lot make mistakes. Here are some errors you might see and how to stop them:
You can stop many problems by doing a few things:
Use variables for hard expressions instead of putting them in resources.
Output important resource properties so you know what your template makes.
Pick the newest API version for each resource to get new features.
Use symbolic names instead of functions like
reference
orresourceId
.Let Bicep handle dependencies when you can.
If you remember these tips, you will write better templates and fix fewer mistakes.
Advanced Parameters
If you want your templates to do more, use advanced parameters. Microsoft Bicep gives you tools to make your deployments smarter and safer. You can use complex types, keep secrets safe, and add rules to your templates.
Complex Types
Parameters can be more than just simple values. Microsoft Bicep lets you use different types to make your templates flexible. Here are some types you can use:
Objects and arrays help you group settings together. For example, you can pass a list of tags or network rules. Try this code to see how it works:
param tags object = {
environment: 'Production'
owner: 'Simon'
}
param allowedIPs array = [
'10.0.0.1'
'10.0.0.2'
]
Tip: Complex types help keep your templates neat. Change one parameter to update many resources at once.
Decorators let you control how parameters work. You can set limits, add notes, or give extra info. Here are some decorators you can use:
Use these decorators to help users and stop mistakes.
Secrets Handling
You must keep secrets safe in your templates. Microsoft Bicep lets you mark parameters as secure. Never put secrets like passwords in your code. Here are some good ways to keep secrets safe:
Check your templates for secrets.
Do not put secrets in your files.
Use Azure Key Vault to store secrets.
Watch and record who uses secrets.
Keep sensitive resources on their own network.
Encrypt secrets when saving or sending them.
Only share secrets with people who need them.
Change secrets often to stay safe.
Give access only to those who need it.
Use the secure
decorator to mark a parameter as secret. Here is an example:
param adminPassword string @secure
Note: The
@secure
decorator hides the value from logs and outputs. This keeps your secrets private.
Validation
You want users to enter the right values. Microsoft Bicep lets you add rules to your parameters. You can use decorators to set these rules. Here is a table showing what you can do:
These decorators help stop mistakes before they happen. For example, you can limit the length of a name or make users pick from a list.
param location string {
allowed: [
'eastus'
'westus'
'centralus'
]
@description('Choose a valid Azure region.')
}
Tip: Add rules to every important parameter. This helps users and keeps your deployments safe.
Using advanced parameters in Microsoft Bicep makes your templates smarter and safer. You can control what users enter, keep secrets private, and build flexible solutions for any project.
Microsoft Bicep Modules
If you want cloud resources that are easy to use, think about modules. Microsoft Bicep modules let you split templates into smaller parts. This helps you work faster and keeps things neat. You can also use the same parts again.
Modular Design
Modules group resources that belong together. For example, one module can be for a storage account. Another module can be for a virtual network. You can use these modules in different projects. You do not need to write the same code many times.
Here is how modules help:
You can use the same logic in many places.
Your code is short and simple to read.
If you change a module, all templates using it get the update.
You set up patterns for your team to follow.
Tip: Using modules saves time and helps you avoid mistakes. Your templates stay the same everywhere. This is good for big teams.
Let’s see an example. You can make a file called storage.bicep
:
param storageAccountName string
resource storage 'Microsoft.Storage/storageAccounts@2022-09-01' = {
name: storageAccountName
location: resourceGroup().location
sku: {
name: 'Standard_LRS'
}
kind: 'StorageV2'
}
In your main file, you use the module like this:
module storageModule './storage.bicep' = {
name: 'storageDeploy'
params: {
storageAccountName: 'myuniquestorage'
}
}
You can use this module in any project. Change the parameter to get a new storage account.
Nested Modules
Sometimes you need to build something big. Nested modules help you split big jobs into smaller pieces. You can put a module inside another module. This makes your work easier to organize and understand.
For example, you might have a main module for your app. Inside, you use modules for the database, web server, and network. Each module does one job. You can test and update them one at a time.
You can use small modules in many places.
Your templates stay neat as your project grows.
Note: Breaking big jobs into small modules makes templates easier to fix and update.
Best Practices
You want your modules to work well together. Here are some best ways to use Microsoft Bicep modules:
Let Bicep handle dependencies for you. If one resource needs another, just reference it. Bicep will know the order.
Use the
dependsOn
property only when needed. Too many dependencies can slow down your deployment.Try the Visual Studio Code visualizer. It shows how your resources connect. This helps you find problems before you deploy.
Give modules clear names and use parameters for things that might change.
Keep modules focused. Each module should do one thing well.
Tip: If you follow these steps, your templates stay easy to read and fix. Your team can work faster and make fewer mistakes.
Here is a table to help you remember:
Using Microsoft Bicep modules makes your cloud work smarter. You can build, test, and update resources with less effort. Your templates grow with your needs. Your team works together and stays on track.
Dynamic Deployments
Dynamic deployments help your templates do more. You can use conditions and loops to control what gets made. This makes Microsoft Bicep files smarter and easier to use.
Conditions
Sometimes you only need a resource in special cases. For example, you might want a network gateway only in production or in one region. Conditions let you choose when to create things.
In Microsoft Bicep, you add an
if
clause to a resource. You use parameters and boolean logic to decide when to deploy.
Here’s how you do it:
Make a parameter for the environment.
Create a variable to check if you need the resource.
Add the
if
clause to your resource.
param location string = resourceGroup().location
@description('Environment Type')
@allowed([
'dev'
'prod'
])
param environment string
var natGateWayDeployBool = environment == 'prod' && (location == 'francecentral' || location == 'northeurope')
resource publicip 'Microsoft.Network/publicIPAddresses@2024-01-01' = if (natGateWayDeployBool) {
name: publicipname
location: location
sku: {
name: 'Standard'
}
properties: {
publicIPAddressVersion: 'IPv4'
publicIPAllocationMethod: 'Static'
idleTimeoutInMinutes: 4
}
}
You can use this idea for many things. For example, skip test resources in production.
Loops
Loops help you make many resources fast. You do not need to write the same code again and again. Use loops to create storage accounts, subnets, or other things.
Loops keep your files short and easy to change. Just update the list and Bicep does the rest.
Resource Creation
Dynamic deployments let you build only what you need. You can use both conditions and loops to control your template.
Try these features in your next project. Your deployments will be faster and easier to manage.
CI/CD Integration
Making deployments automatic saves time for everyone. CI/CD helps your team work together better. It makes sure your Microsoft Bicep templates deploy the right way. You can set up pipelines, keep your code safe, and test everything before it goes live.
DevOps Pipelines
You can use tools to make deployments easy. Some tools you can try are Azure DevOps Services and Jenkins. First, make a Bicep file for your project. Put it in a repository. Add a .bicepparam
file for your parameters. In Azure DevOps, go to Pipelines and make a new pipeline. Pick the repository with your code. Choose the Starter pipeline option. Add a task to deploy your Bicep file. You can use the Azure Resource Group deployment task or the Azure CLI task.
Tip: When you automate deployments, you spend less time clicking buttons. You get more time to build cool things.
Version Control
Version control helps your team work on files together. Store your Bicep files in a system like Git. Every change gets tracked. You can see who made changes and when. If something goes wrong, you can go back to an earlier version.
Note: Always use version control for your templates. It keeps your work safe and makes your team happy.
Testing
Testing your templates before deployment helps you find mistakes early. You can add steps in your pipeline to check your Bicep files for errors. Add a validation step in your pipeline to make sure your templates work. If the test fails, the deployment stops. This keeps broken code out of your cloud.
Here’s an example of a test step in a pipeline:
- task: AzureCLI@2
inputs:
azureSubscription: 'YourServiceConnection'
scriptType: 'bash'
scriptLocation: 'inlineScript'
inlineScript: 'az bicep build --file main.bicep'
Remember: Testing helps you avoid surprises later. Always test before you deploy.
Debugging & Linting
Troubleshooting
Debugging your Bicep templates can feel tricky, but you have tools that make it easier. Start by using the what-if
command. This command shows you what will change before you deploy anything. You can spot problems early and fix them before they reach your cloud.
Try these steps when you run into issues:
Run
az deployment sub what-if --template-file main.bicep
to preview changes.Comment out parts of your code. This helps you find which section causes trouble.
Validate each resource by itself. You can check if every piece works before you put them together.
Tip: Break your template into smaller modules. You can test each module on its own. This makes finding mistakes much faster.
Linter Usage
Linting helps you keep your code clean and reliable. When you use a linter, you catch errors and bugs before they cause problems. Linting tools like Bicep-lint
check your templates for mistakes and make sure you follow best practices.
Here’s why you should use a linter:
You keep your code quality high and your style consistent.
You follow coding guidelines, so your templates work well every time.
You make it easier for your team to read and update your templates.
Linting also finds things like syntax errors, bugs, and odd code that might break later. You save time and avoid headaches by fixing these issues early.
Note: Add linting to your workflow. Run it before you deploy. You will catch problems and keep your templates in top shape.
Template Validation
Template validation is your safety net. You want to make sure your Bicep files work before you use them in real deployments. Use the az bicep build
command to check your templates for errors.
Here’s a quick checklist for validation:
Emoji: 🛠️ Always validate your templates. You will avoid surprises and keep your cloud safe.
Debugging and linting help you write better Bicep templates. You find mistakes early, keep your code clean, and make sure everything works as planned.
Pro Tips & Use Cases
Community Tools
You do not have to work alone when building Bicep templates. The community has created many tools to help you. You can use these tools to save time and avoid mistakes.
Bicep Visualizer: This tool shows your resources and how they connect. You can spot problems before you deploy.
Bicep Linter: This checks your code for errors and best practices. You can run it before you deploy to catch issues early.
Bicep Playground: Try out code and see results right in your browser. You do not need to install anything.
Tip: Join the Bicep community on GitHub or Discord. You can ask questions, share ideas, and learn from others.
Expert Tricks
Want to work like a pro? Try these tricks from Bicep maintainers:
Use parameter files for each environment. You can switch between dev, test, and prod with just one change.
Keep your modules small. Each module should do one job. This makes testing and updates easy.
Use symbolic names for resources. You can reference them without writing long IDs.
Add descriptions to parameters. This helps your team know what each one does.
Note: You can always check the official docs for more advanced tips.
Real-Life Examples
Let’s look at how teams use Microsoft Bicep in real projects.
A company uses modules to set up networks, storage, and databases. They can update one module and roll out changes everywhere.
Another team uses loops to create many resources at once. They save hours on big deployments.
Some users add conditions to skip test resources in production. This keeps their cloud clean and safe.
module vnetModule './vnet.bicep' = {
name: 'vnetDeploy'
params: {
vnetName: 'myVnet'
}
}
You can try these ideas in your own projects. You will see how much faster and easier your deployments become.
You saw how advanced Bicep features help your templates work better. These features make your templates safer too. Try using modules in your next project. Loops can help you build more things quickly. Secure parameters keep secrets safe. Keep looking for new tips and tools. If you want to learn more, follow these steps:
Begin with Bicep basics.
Learn intermediate and advanced Bicep skills.
Study deployment pipelines and resource stacks.
Keep practicing and testing with real projects. You will improve each time you build something.
FAQ
How do you start using modules in Bicep?
Make a new .bicep
file for each module you want. In your main file, use the module
keyword to add the module. Give the module parameters to change how it works for each deployment.
What is the best way to handle secrets in Bicep templates?
Use the @secure
decorator to mark secret parameters. Keep secrets in Azure Key Vault. Do not put passwords or keys in your code files.
Can you test your Bicep template before deploying?
Yes! Run az bicep build --file main.bicep
to look for errors. Use the what-if
command to see what will change. This helps you find mistakes before you deploy.
How do you make your template work for different environments?
Use a parameter file for each environment. Change things like resource names or locations in these files. This lets you deploy to dev, test, or prod without trouble.
What tools help you write better Bicep templates?
Try Bicep Visualizer to see your resources. Use Bicep Linter to find errors. Join the Bicep community for help and tips. These tools help you work faster and safer.