Step-by-Step Guide to Using Personalized Backgrounds in Teams
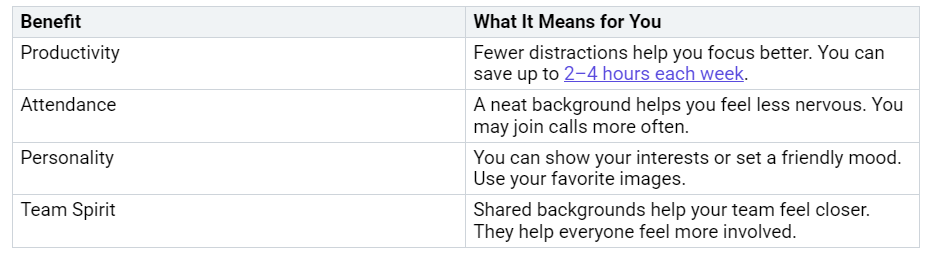
You can make your Microsoft Teams meetings feel more private. You can also make them look more professional by using custom background images. Your organization’s settings or license may let you add your own images. Custom backgrounds do more than just give you privacy. Here are some important benefits:
It is easy to get started. You will feel sure of yourself at every step!
Key Takeaways
Custom backgrounds in Teams help keep your privacy. They also help you focus and make meetings look nice.
You can pick or change your background before meetings. You can also do this during meetings on your computer or phone.
Use good quality pictures in JPG, PNG, or BMP format.
The picture should be less than 2 MB. It should be 1920 x 1080 pixels for the best look. If you cannot add pictures, check your permissions. Also check your Teams version and your organization’s settings.
Keep your Teams app up to date. Try your background before meetings to make sure it looks clear and neat.
Why Use Custom Background Images
Privacy and Professionalism
You want your meetings to look sharp and feel private. Custom Background Images help you block out clutter or anything you don’t want others to see. Maybe your workspace is busy, or you just want to keep your home life separate from work calls. With a virtual background, you can show only what you want. You look more professional, even if your real background isn’t perfect.
Tip: If you use a company-branded background, you show your team spirit and keep things consistent. Everyone sees the same logo or colors, which makes your group look organized.
Here’s how Custom Background Images boost professionalism:
They hide distractions, so you stay focused.
They make your video look clean and polished.
They help you stand out and put your best foot forward.
Microsoft Teams even lets you use frosted glass effects. These can display your company logo in a subtle way. Your admin can set up backgrounds for different departments, so everyone follows the same visual rules. This keeps your meetings looking sharp and unified.
Branding and Engagement
Custom Background Images do more than just hide your room. They help you show off your company’s brand. You can use backgrounds with your logo, office photos, or project updates. This makes your meetings feel more like your company’s space, even when everyone works from home.
A branded background helps people remember your company. It also starts conversations. Maybe someone asks about your background, and you get to share a story or talk about your team. Some companies design backgrounds with tools like Canva, adding banners or messages that match their style.
Custom backgrounds can even boost engagement. If your team uses the same background for a project, everyone feels included. You can assign different backgrounds for marketing or engineering teams. This makes meetings more fun and helps people feel connected.
Note: When you use Custom Background Images, you create a meeting space that feels professional and welcoming. You also help your team stay focused and involved.
Set Up Custom Background Images
You can change your meeting background in Teams before you join, while you are in a meeting, or even on your mobile device. Let’s walk through each way so you feel ready to try it yourself.
Before a Meeting
You can set up Custom Background Images before you join a meeting. This helps you look prepared right from the start.
Here’s how you do it:
1. Open your Teams calendar and pick the meeting you want to join. 2. Click "Join" to open the pre-join screen. 3. Turn on your camera so you can see the video preview. 4. Find the "Effects and Avatars" icon next to the microphone toggle. 5. Click "Video Effects" to open the background settings. 6. Scroll through the default images. You can pick one or click "More Video Effects" and then "Add New" to upload your own image. 7. Choose a file from your computer (JPG, PNG, or BMP). 8. Preview your Custom Background Image. 9. Click "Apply" to save your choice.
Tip: If you don’t see the "Add New" option, your organization may have restricted uploads. You can always use the default backgrounds.
During a Meeting
Sometimes you want to change your background after you’ve joined. Teams makes it easy to switch to Custom Background Images while you’re live.
Follow these steps:
Join your Teams meeting.
On the meeting toolbar, click the "More Actions" button (three dots).
Select "Background Effects" or "Video Effects and Settings."
Pick a default image or click "Add New" to upload your own.
Select your image file and preview it.
Click "Apply" to set your Custom Background Image.
Note: You can change your background as many times as you want during a meeting. Try different images to see what works best for you.
On Mobile Devices
You can use Custom Background Images on your phone or tablet, too. The steps are a little different, but you still get a great look.
Here’s what you do:
Open the Teams app and join a meeting.
On the pre-join screen, turn on your camera.
Tap the "Effects and Avatars" icon.
Tap "Video Effects" and scroll through the options.
Tap "Add New" to upload a photo from your camera roll.
Preview your Custom Background Image and tap "Done" or "Apply."
Tip: Hold your device steady or use a stand. This keeps your background from looking shaky or distracting.
A few things to remember:
Default backgrounds are always available, even if you can’t upload your own.
Your admin or organization may control who can use Custom Background Images. Some features need a Teams Premium license or special settings.
If you don’t see the upload option, check with your IT team or update your Teams app.
Custom Background Images help you look professional and keep your meetings private. You can set them up before, during, or on mobile, so you always have control over your video look.
Image Requirements
Supported Formats and Size
When you upload Custom Background Images to Teams, you want to make sure your files work every time. Teams supports these file formats:
JPG
JPEG
PNG
BMP
Your image should not be too large. Teams only allows files up to 2 MB. If your image is bigger, it might not upload or show up in your meeting. Try to keep your file size under this limit for smooth results.
Tip: If your image does not appear, check the file size and format first.
Recommended Dimensions
You want your background to look sharp and clear. The best results come from images with a 16:9 aspect ratio. Try to use a resolution of at least 1920 x 1080 pixels. This size keeps your background from looking blurry or stretched. Teams also accepts images up to 2048 x 2048 pixels, but sticking to 1920 x 1080 works for most meetings.
If you use smaller images, your background may look pixelated. Larger images can slow down your upload or cause errors. Always test your image before your meeting to see how it looks.
Best Practices
Picking the right Custom Background Images helps you look professional and keeps your meetings focused. Here are some tips to help you choose wisely:
Use high-resolution images that are clean and uncluttered.
Match your background to the meeting type. Neutral scenes work best for business calls.
Avoid busy patterns or anything that distracts from your face.
Make sure your background does not blend with your clothes or skin tone.
Add your company logo or colors for branding, but keep it subtle.
Test your background before joining to check lighting and visibility.
Never use images that might be copyrighted. Stick to photos you own or free resources.
Note: A tidy, relevant background builds trust and helps everyone focus on you.
Troubleshooting
Missing Upload Option
Sometimes you might not see the upload button for custom backgrounds. Don’t worry—this happens for a few reasons. Here’s what you can check:
Your organization may require a Teams Premium license for custom uploads.
Admins need to turn on custom background policies in the Teams admin center.
You must have the right permissions or assigned policies to upload images.
The image you want to use must meet Teams’ size and format rules.
Sometimes, updates to Teams can change or hide the Backgrounds folder. If you lose access, try reinstalling Teams from the official site.
Tip: If you use the same computer as someone else but see different options, check your Teams version and Windows updates. Even small differences can affect what you see.
Upload or Display Issues
If your image won’t upload or doesn’t show up, try these steps:
Make sure your image is a JPG, PNG, or BMP and under 2 MB.
Check that your image is not too large—Teams may reject images over 1800x1800 pixels.
Confirm you have permission to access the folder where Teams stores backgrounds.
Restart Teams after adding or changing images. This refreshes your options.
Clear the Teams cache by closing the app and deleting files in the Teams folder at
%appdata%\Microsoft\Teams
(except the Backgrounds folder).Update your graphics drivers and Teams app to the latest version.
If you use antivirus or firewall software, try turning it off briefly to see if it blocks uploads.
If you still have trouble, ask your IT admin or contact Microsoft support.
Note: Sometimes, just quitting and restarting Teams makes your new backgrounds appear.
Compatibility and Updates
Teams works best when you keep everything up to date. Here’s what you need for smooth background uploads:
Use Teams version 1449/1.0.96.2024081207 or later.
Make sure your account has the right license, like Teams Rooms Pro or Teams Shared Devices.
Your image should be at least 1280 x 720 pixels and between 100 KB and 2 MB.
Stick to JPG, JPEG, or PNG formats.
If your image looks cropped or blurry, try a 16:9 aspect ratio and check the contrast for text readability.
Updates can change how Teams handles backgrounds. If you notice missing features after an update, reinstall Teams or check with your admin about new policies.
Keep Teams updated and follow these tips to avoid most background problems.
You can get your meeting space ready in Teams quickly. First, pick an image in JPEG or PNG format. Make sure it is 1920x1080 pixels. Next, upload your image with the background effects menu. Look at your image and choose it before you join. If you have problems, update Teams and check your permissions.
Personalized backgrounds let you show team spirit. They help meetings feel more fun and professional. Try different styles to see what works best. Always use clear, high-quality images for your meeting.
Check the image rules and fix problems if you need to. You can make every meeting look friendly and neat!
FAQ
How do I know if I can upload custom backgrounds in Teams?
You can check for the "Add New" button in the background settings. If you see it, you can upload your own images. If not, your admin may have turned off this feature.
Why does my background look blurry or stretched?
Your image might not have the right size. Try using a picture that is 1920 x 1080 pixels. This size usually looks sharp and clear in Teams meetings.
Can I use animated or video backgrounds in Teams?
No, Teams only supports still images like JPG or PNG. You cannot use GIFs or videos as backgrounds right now.
What should I do if my custom background won’t upload?
First, check the file size and format. Make sure your image is under 2 MB and saved as JPG, PNG, or BMP. If it still won’t upload, restart Teams or ask your IT admin for help.
Will my background show up for everyone in the meeting?
Yes, everyone in the meeting will see your chosen background. Your background only changes what others see behind you, not their own backgrounds.