

Managing SharePoint Site Provisioning can be hard. Many IT teams feel stressed by too many provisioning tickets. You might face problems like not having rules for many SharePoint sites. Also, doing things by hand often takes too long, which slows things down.
Think about this: creating a site can take several days. This depends on when the support team is free. Last-minute requests can mess up your work and make the process harder. Employees often ask for sites without clear reasons. This leads to more problems. Fixing these issues can help your work run smoother and boost productivity.
Key Takeaways
Automate SharePoint site setup to save time. This reduces manual work. It also helps create sites faster and boosts productivity.
Use the PnP PowerShell tool and templates. This keeps all SharePoint sites looking the same. It helps maintain a consistent style.
Always back up your SharePoint site templates. This protects you from losing data. Follow a backup plan and use the 3-2-1 rule for better safety.
Use good rules to manage access. This protects important information. It helps you follow the rules and makes security better.
Pick the right way to log in to SharePoint Online. Think about security needs and what you need to do for the best outcome.
Prerequisites for SharePoint Site Provisioning
Before you start automating SharePoint site provisioning, gather the right tools and permissions. This preparation helps everything go smoothly and quickly.
Required Tools
To automate your SharePoint site provisioning well, you need these tools:
PnP PowerShell Module: Install this module to use many cmdlets for SharePoint management.
PnP Provisioning Engine: Use this engine to set up your site. You can configure site columns, content types, and list definitions. You can also export your design into a template format like XML or JSON.
PowerShell Cmdlets: Use your templates on many target sites with commands like:
Connect to SharePoint Online:
Connect-PnPOnline -Url “https://yourtenant.sharepoint.com/sites/targetcommunicationsite”
Invoke the site template:
Invoke-PnPSiteTemplate -Path “PnP-Provisioning-File.xml”
Permissions Needed
You must also have the right permissions to run provisioning scripts. The table below shows the minimum permissions needed:

Having the right permissions is very important. It lets you manage site creation and setup without access problems.
Importance of Governance
Good governance is very important in your provisioning process. It sets clear rules and roles that improve security and compliance. Here are some key governance points to think about:
Access Management: Automate permission assignments based on user details.
Content Protection: Use data loss prevention policies to keep sensitive information safe.
Lifecycle Management: Automatically archive or delete sites based on set rules.
By focusing on governance, you make sure your SharePoint site provisioning stays secure, compliant, and efficient.
Site Template Backup
Backing up your SharePoint site templates is very important. It keeps your hard work safe and helps you recover from problems. If you lose a template, making it again can take a lot of time and effort. Regular backups help you avoid confusion and keep your site provisioning consistent.
Importance of Backups
You should think about a few reasons for backing up your templates:
Data Protection: Backups protect your templates from being deleted or damaged by mistake.
Version Control: Keeping different versions lets you go back to an earlier one if needed.
Compliance: Regular backups help you follow rules and keep a record.
To make sure your backup practices work well, follow these tips:
Set a good backup schedule and automate it.
Use the 3-2-1 rule: Keep three copies of data on two types of media, with one stored off-site.
Use safe off-site backups to guard against big problems.
Encrypt sensitive data for better security.
Check each backup’s quality using automated tools.
Regularly check backup rules to make sure they meet your recovery goals.
Backup Script
You can use this PowerShell script to back up your SharePoint site templates. This script saves the template to a chosen location:
# Connect to SharePoint Online
Connect-PnPOnline -Url “https://yourtenant.sharepoint.com/sites/yoursite” -UseWebLogin

# Define the path for the backup
$backupPath = “C:\Backups\YourTemplate.xml”

# Export the site template
Get-PnPSiteTemplate -Out $backupPath -IncludeAllContent
This script connects to your SharePoint site and saves the current site template to the backup location you chose. Make sure to change the URL and backup path to fit your needs.
By having a strong backup plan, you can make sure your SharePoint site provisioning stays reliable and efficient.
Connecting with PnP PowerShell
Connecting to SharePoint Online with the PnP PowerShell module is very important. It helps you automate your SharePoint site provisioning. You can connect in different ways. Each way works best for different situations.
Establishing Connection
To connect to SharePoint Online, use the Connect-PnPOnline command. This command lets you enter the URL of your SharePoint site and choose how you want to log in. Here are some common ways to connect:
Interactive Authentication
Connect-PnPOnline -Url “https://yourtenant.sharepoint.com” -ClientId “<your-app-id>” -InteractiveApp-Only Authentication
Connect-PnPOnline -Url “https://yourtenant.sharepoint.com” -ClientId “<your-app-id>” -ClientSecret “<your-secret>”App-Only with Certificate
Connect-PnPOnline -Url “https://yourtenant.sharepoint.com” -ClientId “<your-app-id>” -Tenant “<your-tenant-id>” -CertificatePath “C:\certs\pnp.pfx” -CertificatePassword (Get-Credential)
These commands help you connect safely to your SharePoint site. Pick the method that works best for your security needs and how you operate.
Authentication Methods
When you connect with PnP PowerShell, you have different ways to log in. Each way has its own benefits and security risks. Here’s a quick look at the authentication methods:
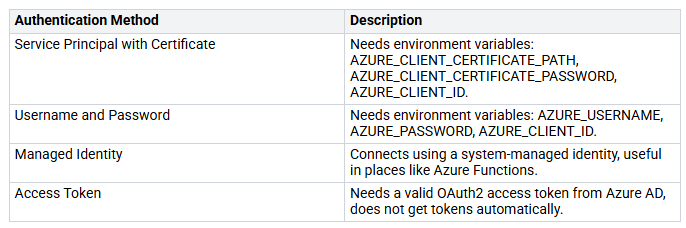
Think about the security of each method. For example, using a username and password is easy but can risk exposing your login info if not careful. On the other hand, interactive authentication allows for extra security checks, which is safer.
Using OAuth2 access tokens keeps your login info safe and reduces risks. Certificate-based authentication is a secure way to handle sensitive data without putting it in scripts.
By knowing these methods, you can pick the best way for your SharePoint site provisioning needs.
SharePoint Site Creation
Making a new SharePoint site is easy with PnP PowerShell. You can automate this job to save time and keep things the same across your organization. Below is a script that helps you create a new site.
Site Creation Script
To make a new SharePoint site, use the New-PnPSite command. This command lets you set different options, like the site type, title, and URL. Here are some examples of how to use this command:
New-PnPSite -Type CommunicationSite -Title Contoso -Url https://tenant.sharepoint.com/sites/contoso -SiteDesignId ae2349d5-97d6-4440-94d1-6516b72449acMakes a new Communications Site collection called ‘Contoso’ with the given URL, using a custom design.
New-PnPSite -Type CommunicationSite -Title Contoso -Url https://tenant.sharepoint.com/sites/contoso -Classification “HBI”Makes a new Communications Site called ‘Contoso’ and sets the classification to ‘HBI’.
New-PnPSite -Type CommunicationSite -Title Contoso -Url https://tenant.sharepoint.com/sites/contoso -ShareByEmailEnabledMakes a new Communications Site that allows inviting outside users.
New-PnPSite -Type TeamSite -Title ‘Team Contoso’ -Alias contosoMakes a new Modern Team Site called ‘Team Contoso’ with the given URL.
New-PnPSite -Type TeamSiteWithoutMicrosoft365Group -Title Contoso -Url https://tenant.sharepoint.com/sites/contosoMakes a new Modern team site not linked to an M365 group called ‘Contoso’.
These commands let you create different types of sites based on what you need. You can easily change them to fit your specific needs.
Customizing Site Settings
You can customize your SharePoint site when you create it to fit your organization’s needs. Here are some important customization options to think about:
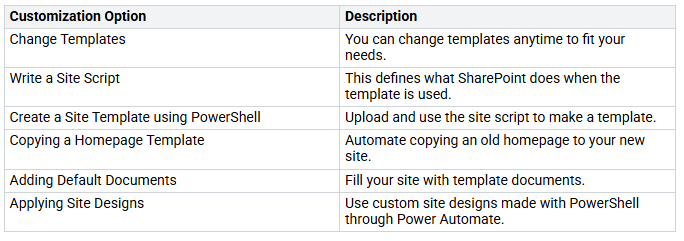
You can also create a Microsoft 365 Group or a Microsoft Team, which automatically includes a SharePoint site when you create the group. This makes the process easier and ensures everything is ready from the start.
By using these customization options, you can create a new SharePoint site that matches your organization’s style and needs. This helps improve user experience and keeps things consistent across your SharePoint environment.
Applying Site Templates
Using site templates in SharePoint helps keep your sites looking the same and working well. With PnP PowerShell, you can easily use these templates to make your setup faster.
Template Application Script
To use a site template, type the Invoke-PnPSiteTemplate command. This command lets you apply a template in XML format to your SharePoint site. Here are some ways to use this command:
Invoke-PnPSiteTemplate -Path template.xml -Url https://tenant.sharepoint.com/sites/sitename: This applies a site template in XML format to the site you choose.Invoke-PnPSiteTemplate -Path template.xml: This applies a site template in XML format to the site you are connected to.Invoke-PnPSiteTemplate -Path template.xml -ResourceFolder c:\provisioning\resources: This applies a site template in XML format to the current web and gets resources from the folder you picked.
With these commands, you can easily apply your reusable template to many sites. This keeps everything looking and feeling the same across your organization.
Best Practices
Managing and updating your SharePoint site templates well is very important. It helps keep everything working right and following rules. Here are some best practices to think about:
Use Standard Naming Conventions: This makes it easy to find and access pages and lists.
Avoid Hard-coding Values: This creates a flexible environment that changes easily.
Use Documented APIs: They help you change SharePoint functions without causing problems with future updates.
Test Customizations Before Deploying: Testing on different devices and getting user feedback can stop issues with productivity.
Also, think about these strategies to keep your templates consistent across many SharePoint sites:
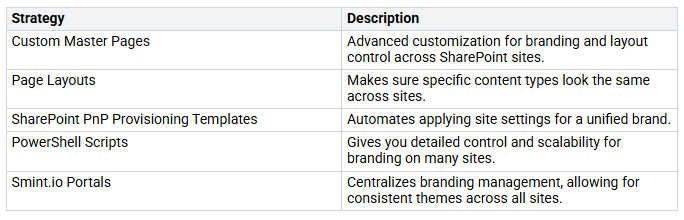
Regularly check and update your templates to keep them working well and following rules. Set up a review cycle and alerts in SharePoint Online to keep your templates up to date with changing rules and business needs. This proactive approach helps keep your site provisioning accurate and relevant.
Using PnP PowerShell and the PnP Framework to automate SharePoint site provisioning has many benefits. You get consistency because all sites will have the same settings and templates. Automation helps you do less manual work, so you can easily apply templates to many sites. Plus, you have flexibility to change templates for different site needs.
Here are some important steps to take:
Connect to your SharePoint site with PnP PowerShell.
Use the command to apply the provisioning template.
Add this process to your CI/CD pipeline with tools like Azure DevOps or GitHub Actions.
In the future, look for trends like:
Automated Processes: Making things more efficient, secure, and compliant.
Integration with Microsoft Teams: Helping with governance and management.
Scalability: Managing many workspace requests easily.
By following these practices, you can make your SharePoint provisioning process smoother and boost overall productivity.
FAQ
What is the PnP provisioning framework?
The PnP provisioning framework helps you create SharePoint sites automatically. It lets you use PnP provisioning templates to keep your sites looking the same. This framework makes it easier to manage site settings and configurations.
How do I apply a PnP provisioning template?
To use a PnP provisioning template, type the Invoke-PnPSiteTemplate command. This command lets you apply your template to a specific site or the site you are currently connected to.
What are the benefits of using PnP PowerShell?
Using PnP PowerShell makes SharePoint management faster and more flexible. It helps you automate tasks, apply templates, and manage sites easily. This method cuts down on manual work and keeps your SharePoint environment consistent.
Can I customize my site after applying a template?
Yes, you can change your site after using a template. You can adjust settings, add content, and change layouts to meet your organization’s needs. This flexibility helps keep your site useful and up-to-date.
How often should I back up my site templates?
You should back up your site templates often. Set up a backup schedule to protect your templates from being lost or damaged. Regular backups help keep your SharePoint provisioning process consistent and compliant.


