

Many small and medium businesses face a problem. 52% say cost is a big issue. It stops them from good incident management. Some companies have old plans. Their communication is not modern. They also have few resources. This happens when an incident occurs. But you can use your Microsoft 365 better. Build a strong incident management system portal. Use SharePoint for this. A good SharePoint IMS portal helps with risks. It makes things work better. This portal puts all incident logs in one place. It sends alerts right away. This makes it a strong information management system. This portal helps manage every incident well. Let’s see how to build this SharePoint portal.
Key Takeaways
Plan your SharePoint incident management system carefully. Know who will use it and what types of problems you need to track.
Build a special SharePoint site. Create lists to hold all incident information. Set up who can see and do what.
Make forms simple for reporting problems. Design views that help your team track incidents easily. Make sure the system works on phones.
Use Power Automate to make tasks happen by themselves. Send alerts through email or Microsoft Teams. Use AI to help sort and manage incidents.
Check how well your system works with dashboards. Track important numbers like how fast problems are fixed. Ask users for their thoughts to make the system better.
Step 1: Define IMS Requirements
Plan carefully. Do this before building your SharePoint incident management system portal. This first step makes sure your system fits your organization’s needs.
Identify Stakeholders & Needs
First, know who will use your IMS. This includes people who report problems. It also includes those who fix them. An incident response team acts fast. An Incident Manager guides the work. They manage all actions. A Tech Lead finds tech solutions. A Communications Manager shares updates. A Scribe writes down key details. Knowing these roles helps design your SharePoint site.
Outline Incident Types & Severity
Not all problems are alike. You must name different types of issues. You also need to set how bad they are. For example, a SEV 1 problem is very bad. It stops business. A security breach is a SEV 1. A client service being down for everyone is also a SEV 1. A SEV 2 issue has a big effect. But some work can still happen. A SEV 4 is small. It causes minor trouble. This helps your team decide what to fix first.
Determine Required Data Fields
What info do you need for each problem? Your SharePoint portal needs certain data fields. These help track and fix issues. Key fields include problem details. They also include customer impact. And affected services. You also need to know who is helping. And the current status. Tracking the main cause is also key. Follow-up actions are important for good solutions.
Map Incident Lifecycle
An incident has many steps. You need to map this path for your IMS. It often starts with finding the problem. Then, you log it in your portal. Next, you sort and rank it. After that, you fix the incident. This may mean stopping it. Getting rid of it. And getting things back to normal. This clear path helps your management. It makes sure nothing is missed.
Step 2: Design SharePoint Site & Lists
Set up your SharePoint. This step is about practical setup. You will build the base. This is for your incident system.
Create Dedicated SharePoint Site
First, make a new SharePoint site. This site is your main hub. It is for the IMS. You can make it a new site. Or a subsite. A special site keeps things separate. It is easy to find. You can add quick links. These help users move around. You can aim links at groups. Different users see different links.
Develop Custom Incident Lists
Next, build custom lists. These lists hold all incident data. You need a main list. It is for all incidents. This list tracks each problem. Think about these columns:

This helps you track every incident.
Add Supporting Lists (Categories, KB)
You also need more lists. Make a list for categories. The ‘Work tracker‘ helps manage tasks. It has list structures. These are for ‘Category’ and ‘Priority’. The ‘Category’ field has choices. These are planning, design, engineering, and marketing. The ‘Priority’ field has options. These are critical, high, medium, and low. You can use these. Also, build a KB list. This list stores solutions. It is for common problems. It helps your team fix things faster. This makes incident management better.
Implement User Permissions
Last, set up user permissions. This controls who sees what. It also controls who does what. Give different access levels. These are for different roles. For example, reporters just submit. Responders view and update all. Good permissions protect info. They make the system run well. This makes your portal safe and good.
Step 3: Customize Forms & Views
You have your needs. Your SharePoint site is ready. Now, make your incident management system (IMS) simple. This step is about how people use your portal.
Simplify Incident Submission Forms
Make reporting an incident easy. Hard forms can stop users. Design forms that ask for key info first. Use SharePoint’s form tools. Hide less important fields. Show them later. A simple form helps users log new incidents. This makes your incident management portal better to use.
Design Intuitive Tracking Views
Make views that help your team. They can track incidents easily. Set up different views. These are for different roles. For example, “My Open Incidents“ shows only a user’s incidents. “Critical Incidents“ shows urgent problems. Use columns like status. Also, priority and assigned to. This helps your team find info fast.
Highlight Critical Incidents
You need to see urgent issues fast. Use colors or symbols. They highlight critical incidents.
SharePoint List-based Status Indicators: Put indicators right in your SharePoint list. Set rules for them. For example, if an incident’s impact is “High,” show a red icon. You can count “Number of list items.” Or “Percentage of list items.”
Excel-based Status Indicators: Use data from an Excel file. Save it on SharePoint. The indicators change by themselves. This happens when your Excel data changes.
Web Parts: Use web parts to get attention.
The Hero web part shows important news.
Quick links give easy access. These are for resources.
The Image web part points to key pictures.
Ensure Mobile Responsiveness
Your incident management portal must work on any device. Many people use phones.
Simplify Navigation: Use menus that fold up. Like hamburger icons. This makes moving around easy. Especially on small screens.
Focus on Key Features: Make sure important things are easy to click. Users should not need to zoom.
Improve Load Times: Make pictures smaller. This helps pages open faster. Especially on phone networks.
Optimize Touch Interactions: Make buttons big. Give them enough space. This makes them easy to tap. This is for touchscreens.
Reduce Content Clutter: Take out extra words and pictures. This makes the screen cleaner.
Test Across Devices: Always check your SharePoint site. Do this on different phones and tablets.
Modern SharePoint is more flexible. It works faster. It has nice designs. Modern pages open quickly. They work well on phones. This makes it easier for users. They can be anywhere.
Step 4: Automate Workflows & Notifications
You can make your incident management system (IMS) better. Make tasks happen on their own. This saves time. It also makes fewer mistakes.
Leverage Power Automate for Processes
Power Automate helps you build automatic steps. These steps do many jobs. For example, you can make incident reports automatic. You can also make approvals automatic. Fixes are watched until done.
An employee sends an incident report form in SharePoint.
A new item is made in the SharePoint list.
An email goes to the Safety Officer to check.
The incident goes to the right team.
Fixes are watched. Reminders are sent if late.
The incident is marked done when fixes are complete.
Set Up Email & Teams Notifications
You need to tell people about news. Use email or Microsoft Teams. Most people turn off email. They use Teams often. This means fewer extra messages. If you check email more, keep email alerts on. This makes sure you see important news.
You can change your Teams alerts. Go to Settings and more > Settings > Notifications and activity. You can set alerts for chats. Also for channels and meetings. Make a special Teams channel for urgent alerts. This channel is separate from normal chats. Teach your staff what it is for. This makes sure everyone knows where to find urgent news.
Integrate AI for Assistance
AI can make your IMS smarter. It helps during the whole incident time. AI sorts and ranks things automatically. This means fewer human mistakes. It also makes things faster and more exact.
AI finds problems early. It watches service data live.
It puts many alerts into one incident. This helps teams focus.
AI can sort incidents automatically. It makes tickets with details.
It sends problems to the best team. This makes things faster.
AI suggests answers. It shows helpful articles.
It sums up incidents. This makes talking better.
Implement Approval Workflows
Some incidents need a “yes.” You can set up approval steps. These steps make sure things are checked right. For example, you might need a “yes” for urgent incidents.
You can do these steps in many ways. You can give approvals to people directly. You can also use set rules. These rules say how approvals flow. Harder steps can be drawn out. This allows for approvals one by one or all at once.
Step 5: Implement Reporting & Improvement
You built your SharePoint portal. Now, see how it works. This step measures success. It helps you make things better.
Create Incident Dashboards
See how your incident management system portal performs. Make incident dashboards. They show key info fast. See how many issues came up. This shows the top five projects. They have the most issues. Track issues that meet SLAs. Or those that do not. This shows weekly counts. It includes breach percentages. Dashboards also show mean time to resolution. This is average hours to fix an issue weekly. See mean time to respond. This is average minutes to answer weekly. These dashboards help you understand your incident management.
Track Key Performance Indicators
Track Key Performance Indicators (KPIs). They measure your IMS effectiveness.
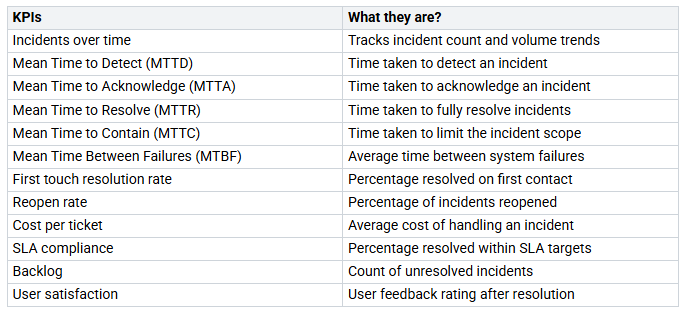
You can also track uptime. This shows system availability. A high MTTR means workflow issues.
Establish User Feedback
Know what users think. Get user feedback. Use feedback methods. Gather user input. Use this to make changes. This makes your SharePoint portal better. It improves your incident management.
Regularly Review & Update
Good incident management is always changing. It needs regular checks. It needs updates. This helps you face new problems. It makes your company strong. It handles surprises.
Review each incident. Learn from it. Do full post-incident reviews. Find good things. Find areas to improve.
Always make your management plan better. Use what you learned. This helps your team. They can handle new problems.
Update documents often. Make sure records are current. Do this after an incident. Check documents regularly. This keeps them right and useful.
You can make your incident management better. Follow these five steps. You will stop problems before they start. This gives you more data. It helps you prevent risks. A good SharePoint portal helps a lot. It makes reporting easy. It fixes problems faster. This is because of automatic steps. You lose less information. You get smart ideas from data. You can see things more clearly. Use SharePoint’s tools. Build a smart system. It will work well for you. This strong system makes your management better.
FAQ
How does SharePoint make incident reporting better?
SharePoint makes reporting easy. You can use simple forms. People log incidents fast. This makes them less frustrated. You get important facts quickly. This helps your incident management.
Can I make tasks automatic in my SharePoint IMS?
Yes, you can do this. Use Power Automate. It does many tasks. It sends messages. It also sends incidents to the right place. This saves time. It makes your work better.
Does the SharePoint IMS work well on phones?
Yes, it does. New SharePoint pages work on phones. They fit different screen sizes. Your team can report incidents anywhere. They can track them too. You can stay updated on the go.
How can I see how well my incident management system works?
You can make dashboards. These show important numbers. They show how many incidents there are. They also show how fast they are fixed. This helps you see if your system works. You can use facts to make it better.
