

Microsoft Graph consent is very important for apps using Microsoft 365 resources. It helps you control permissions well. This makes sure apps only access the data they need. Knowing these permissions is key for keeping things safe. Recent security reports show that many organizations miss app visibility and installed apps. This mistake can create weaknesses. Apps with admin permissions can change important security settings. This raises the chance of unauthorized access. By understanding Microsoft Graph consent, you can protect your organization’s resources and improve functionality.
Key Takeaways
Microsoft Graph consent controls what apps can do. It makes sure apps only get the data they need. This keeps information safe and secure.
Know the difference between delegated and application permissions. Delegated permissions need user approval. Application permissions require admin approval.
Always use the least-privilege principle when giving permissions. Only give the minimum access needed for apps to work well.
Check and review app permissions often in the Azure Portal. This helps find permissions that are not needed and lowers security risks.
Use Microsoft Graph Explorer to test and manage permissions. This tool helps make sure your apps have the right access to resources.
Overview of Microsoft Graph Consent
What is Microsoft Graph?
Microsoft Graph is a strong tool that connects to many Microsoft cloud services. It gives you one API endpoint to access resources in Microsoft 365. With Microsoft Graph, you can work with user profiles, emails, calendars, documents, and more. This makes it easier to manage permissions for your apps.
Here are some important features of Microsoft Graph:
Unified API Endpoint: Use one interface to access many Microsoft services.
Rich Data Access: Get a wide range of resources to improve your app’s features.
Cross-Platform Nature: Work smoothly on different devices and platforms.
Real-Time Updates: Use webhooks for instant alerts on data changes.
Importance of Microsoft Graph in Application Development
Knowing Microsoft Graph is very important for making secure applications. It helps you manage permissions well, so your apps only access the data they need. This is where consent is important.
When you create applications, you need to think about two types of permissions: delegated and application permissions.
By managing these permissions, you can protect access to sensitive data. For example, delegated permissions need user consent, while application permissions need admin consent. This difference is key for keeping a secure environment.
Types of Permissions in Microsoft Graph
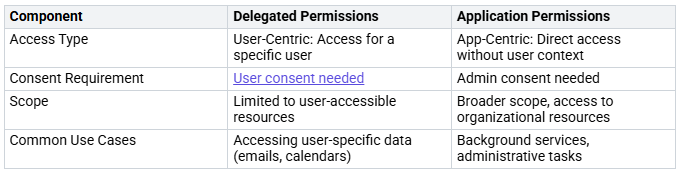
Delegated Permissions
Delegated permissions let apps act for the signed-in user. This means when a user logs into an app, it can access resources based on their permissions. This setup improves security by limiting access to user-specific data. For example, if you use an app like DatabeatOMNI, it can only see information based on your permissions.
Here are some common delegated permissions used in Microsoft Graph integrations:
Access user profiles
Read user emails
Manage user calendars
Access group memberships
These permissions can be approved by an administrator or given directly by the user. This flexibility helps organizations control what data apps can access while letting users have a say in their data privacy.
Application Permissions
Application permissions give broader access to the apps themselves. These permissions let apps do things without needing user sign-ins. For example, an app can book a meeting room without needing individual user logins. While this can make things easier, it can also create a higher security risk if not managed well.

Choosing between delegated and application permissions means balancing the benefits and risks. Delegated permissions improve security by limiting access to user-specific data. On the other hand, application permissions make processes easier but need careful management to protect sensitive information.
Granting Permissions in Azure Portal
Accessing the Azure Portal
To manage permissions well, you need to access the Azure Portal first. Here’s how to do it:
Open your web browser and go to the Azure Portal.
Sign in with your Microsoft account that has admin rights.
After logging in, find the Azure Active Directory section on the left menu.
Sometimes, accessing the Azure Portal can be tricky. Users may see permission errors, even with a Global Admin account. You need specific permissions for Microsoft Graph API access, no matter your account’s admin status. Also, conditional access policies might cause access problems, needing extra user verification.
Setting Up Permissions
Once you are in the Azure Portal, you can start granting permissions. Here’s a simple guide to help you:
Register your application in Azure AD: Go to the App registrations section and click on New registration. Fill in the details and click Register.
Add necessary API permissions for Microsoft Graph: In the app registration, go to the API permissions tab. Click on Add a permission, then choose Microsoft Graph. Pick the type of permissions you need (delegated or application) and select the specific permissions for your app.
Grant admin consent for the permissions added: After adding permissions, click on the Grant admin consent for [Your Organization] button. This step is important because it lets your app access the resources without asking users for consent.
Create a client secret for secure access: Go to the Certificates & secrets tab. Click on New client secret, write a description, and set an expiration time. Save the secret safely, as you will need it for authentication.
Tip: Misconfigured access controls cause 80% of breaches. Regular audits are important in Azure to reduce risks.
When granting permissions, always use a least-privilege design. This means only use the minimum permissions needed for your app to work. Here are some best practices to follow:
Use the least privileged permission needed for the app, like
User.Readfor reading user profiles.Have backup plans for when permissions are blocked, so users still get value from the app.
Clearly document all permissions, explaining how they are used and their effects on user experience.
By following these tips, you can improve security and lower the risk of unauthorized access to sensitive data. Remember, managing permissions is not just a one-time job; it needs regular attention and reviews.
Testing User Consent with Microsoft Graph Explorer
Microsoft Graph Explorer is a great tool for testing user consent and permissions. You can use it to work with Microsoft Graph APIs right from your browser. It helps you see what permissions your apps need and how they affect access to resources.
How to Test Permissions
To test permissions with Microsoft Graph Explorer, follow these steps:
Open Microsoft Graph Explorer at https://developer.microsoft.com/en-us/graph/graph-explorer.
Sign in with your Microsoft account. Make sure this account has the right permissions to access the resources you want to test.
Click your profile picture and choose the Consent to permissions option. This shows all the available permissions.
From the list, consent to the permissions you want. You can also use the Modify permissions tab to see which permissions are needed for specific queries. This helps you pick the least privileged option.
If a query fails because of not enough permissions, you can consent to the needed permissions through the Modify permissions tab.
By following these steps, you can manage permissions well and make sure your apps have the access they need.
Analyzing Test Results
After testing permissions, you should analyze the results to find any permission problems. To do this, get the required permissions for specific API calls. Sign in with an Admin account and use the Modify Permission tab in Graph Explorer. This helps you find the necessary permissions for the commands you want to use.
For example, running commands like Connect-MgGraph with the right scopes asks for the needed permissions. This step helps you find and fix permission issues easily.
Remember, managing permissions is very important for keeping security. Microsoft Graph Explorer helps you manage permissions well, which is key for spotting consent problems. The least permission model can make it hard to understand the specific permissions needed for requests. So, regularly checking permissions helps avoid too many consents and keeps your apps running smoothly.
Resource Specific Consent and Service Principals
Resource-specific consent lets apps access only what they need. This makes security better by limiting what they can reach. When you use resource-specific consent, apps won’t have extra permissions. This is very important in big organizations where many apps need different access levels to sensitive data.
Setting Up Service Principals
Service principals are like identities for your apps, services, and automation tools. They help these entities access certain resources in Microsoft Graph. By using service principals, you can give specific API permissions to apps. This makes sure each app only accesses what it needs. In places with many apps, this focused method is key for keeping security and compliance.
To set up a service principal, follow these steps:
Go to the Azure Portal.
Click on Azure Active Directory.
Select App registrations and find your app.
Click on Create a service principal.
This process helps you manage permissions well and makes sure your apps stay within their access limits.
Testing API Calls with Service Principals
Testing API calls with service principals is important to check if your apps have the right permissions. Here are some common API call situations you might test:

You can use these API calls to test permissions:
GET /servicePrincipalsGET /servicePrincipals/{id}GET /servicePrincipals(appId=’{appId}’)
By testing these calls, you can make sure your apps have the permissions they need to work right. This careful approach helps you find and fix any permission problems before they affect your users.
Managing Group Permissions
Group permissions are very important for managing access in Microsoft Graph. They help you decide who can see certain resources and work together well. By managing group permissions, you can form teams that improve cooperation and make it easier to access resources. Setting permissions correctly helps users share information while keeping things safe.
Understanding Group Permissions
Group permissions let you control access for many users at the same time. This makes it easier to give permissions, especially in big organizations. Here are some main benefits of group permissions:
Help users work together by letting them share information easily.
Allow the creation and management of teams, which is key for good resource access.
Make sure the right permissions are important for managing data access through Microsoft Graph Services.
Steps to Add Group Permissions
Adding group permissions in Microsoft Graph is simple. Follow these steps to do it right:
Make sure the signed-in user has a supported Microsoft Entra role or a custom role with the
microsoft.directory/groups/members/updatepermission.Use the right HTTP request to add members:
POST /groups/{group-id}/members/$refPATCH /groups/{group-id}
Add the necessary request headers:
Authorization: Bearer {token}Content-type: application/json
Build the request body with the correct JSON object for the group member.
Check the response code to see if it worked:
204 No Contentmeans success.400 Bad Requestif the member is already in the group.404 Not Foundif the member does not exist.403 Unauthorizedif permissions are not enough.
A 204 No Content response means you added a member successfully. If you get a 400 Bad Request, it means the member is already in the group. A 404 Not Found response shows the member does not exist, while a 403 Unauthorized response means permissions are not enough.
By following these steps, you can manage group permissions well and help your organization stay secure and collaborative.
Managing Microsoft Graph consent is very important for keeping your apps safe and protecting private information. You need to know the differences between delegated and application permissions. This understanding helps you decide wisely about giving access.
Here are some good practices to follow:
Limit access by giving only the least privileges needed.
Carefully check applications before giving consent.
Regularly review and take away permissions that are not needed.
By using these strategies, you can improve security and make sure your organization follows the rules. Remember, managing consent well is a process that needs your attention all the time.
FAQ
What is Microsoft Graph consent?
Microsoft Graph consent helps you manage which resources your apps can use. It makes sure apps only get the permissions they need. This improves security and keeps things compliant.
How do I grant permissions in Azure Portal?
To grant permissions, go to the Azure Portal. Register your app, add API permissions for Microsoft Graph, and give admin consent. This way, your app can access the resources it needs.
What are the risks of over-permissioning?
Over-permissioning raises the chance of unauthorized access. If apps have too many permissions, attackers can take advantage of these weaknesses. This could lead to data breaches.
How can I review app permissions regularly?
You can check app permissions by going to the Azure Portal and looking at app registrations. Regular audits help find unnecessary permissions and keep a secure environment.
What is the least-privilege principle?
The least-privilege principle means giving only the minimum permissions needed for an app to work. This method lowers the risk of unauthorized access and boosts overall security.
