

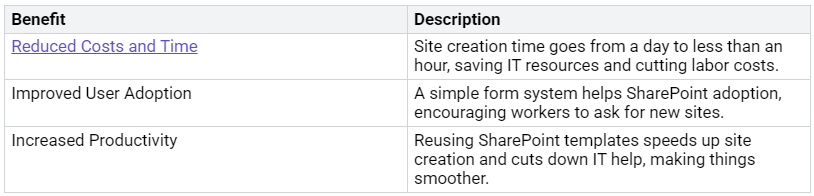
Automating SharePoint site provisioning changes how you handle your digital workspace. By using Site Scripts and PnP PowerShell, you make processes easier. This helps keep things the same and safe on all your SharePoint sites. Automation saves a lot of time. For example, organizations say they save 60% in costs and time when they use these tools. Because of this, you improve efficiency and lower mistakes and labor costs. Use automation to build a better SharePoint environment.
Key Takeaways
Automating SharePoint site setup saves time and cuts costs by up to 60%. This helps work better and makes fewer errors.
Make sure you have the right permissions and tools. Use PnP PowerShell and the PnP Provisioning Engine to manage site setup well.
Use Site Scripts to make site creation the same. This keeps branding and layout consistent for all SharePoint sites.
Use PnP PowerShell for advanced tasks. This includes managing permissions and roles, making site setup more flexible and safe.
Use versioning and monitoring to keep your SharePoint setup organized and efficient. This helps prevent problems like abandoned sites and unclear ownership.
Prerequisites for Automating SharePoint Site Provisioning
Before you begin automating SharePoint site provisioning, make sure you have the right permissions and tools.
Required Permissions
To use Site Scripts and PnP PowerShell well, you need specific permissions. Here’s a quick list of the minimum permissions needed:

Having these permissions helps you manage site provisioning without problems. Always check that your account has the needed permissions before moving forward.
Necessary Tools
You will need important tools to automate SharePoint site provisioning well. The two main tools are PnP PowerShell and the PnP Provisioning Engine.
PnP PowerShell: This tool helps automate site provisioning. It improves governance, cuts down errors, and works with other automation tools. It allows for quick, error-free provisioning of SharePoint sites, keeping in line with your organization’s standards.
PnP Provisioning Engine: This open-source tool offers flexibility and scalability. It lets you create and use templates, export and import settings, and add content. This makes it great for complex situations and personal customizations.
Having these tools will make your automation easier and help keep things consistent across your SharePoint sites.
Also, setting up a governance framework is very important. A good governance framework helps you manage updates and see their effects. It balances control and flexibility, making sure your automated processes follow organizational rules.
What Site Scripts Do Well
Site Scripts are very important for automating SharePoint site creation. They let you set up actions for your SharePoint sites. This helps keep things the same and works well. Here are some main things Site Scripts can do:
Site Script Capabilities
With Site Scripts, you can do many automation tasks, such as:
Creating site columns and content types, and changing other list settings.
Setting site branding features like navigation layout and header background.
Applying a theme to make your site look better.
Adding a site logo to show your brand.
Putting links in quick launch or hub navigation for easy access.
Starting a Power Automate flow to connect with other services.
Installing a solution from the app catalog.
Setting regional settings for the site to fit local needs.
Adding users and groups to SharePoint roles for access control.
Allowing external sharing for the site to manage teamwork.
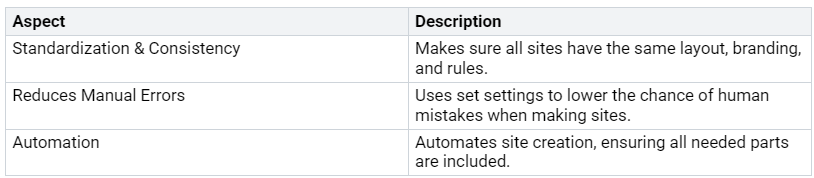
These features make sure all sites have the same layout, branding, and rules. This standardization cuts down on mistakes by using set settings. It lowers the chance of human error when creating sites. By automating site creation, you make sure all needed parts are included, which leads to a smoother workflow.
Sample Site Script Snippet
To show how to create a Site Script, here’s a sample snippet:
{
  “actions”: [
    { “verb”: “applyTheme”, “themeName”: “CustomTheme” },
    { “verb”: “setSiteLogo”, “logoUrl”: “https://example.com/logo.png” },
    { “verb”: “disableSharing” },
    { “verb”: “triggerFlow”, “flowName”: “SiteProvisioningFlow” }
  ],
  “version”: 1
}
In this example, the Site Script does these things:
It applies a custom colorful theme to the SharePoint site.
It turns off external sharing for better security.
It starts a Power Automate flow, allowing connection with other services and task automation.
By using Site Scripts, you can automate SharePoint site creation well. This makes sure your sites are consistent, secure, and ready to use.
PnP PowerShell for Advanced Configuration
When you automate SharePoint site provisioning, you may face tricky tasks that Site Scripts can’t do alone. This is where PnP PowerShell is very helpful. It gives you advanced tools that improve your provisioning workflows. You can manage permissions, change site settings, and do many admin tasks easily.
Breaking Inheritance
One important task you can do with PnP PowerShell is breaking inheritance for permissions. This lets you set special permissions for certain lists, libraries, or items. Here are some good tips to follow when breaking inheritance:
Check if the folder already has special permissions before breaking inheritance.
Use the
BreakRoleInheritancemethod with options to keep current permissions and item-level permissions.Tell the user about the status of permission inheritance.
By following these tips, you keep your permission settings organized and safe.
Assigning Roles
Assigning roles and permissions during site provisioning is another area where PnP PowerShell works well. You can easily manage user access and group memberships. Here’s how to do it:
Connect to the site using this command:
Connect-PnPOnline -Interactive -ClientId “<ClientID>” -Url “https://<TenantDomain>.sharepoint.com/sites/<SiteName>”
Get the current signed-in user and make them an owner:
Set-PnPTenantSite -Url “https://<TenantDomain>.sharepoint.com/sites/demo-finance” -Owners $currentUser
Add a user to the visitors group:
Add-PnPGroupMember -LoginName “dale.cooper@contoso.com” -Group $VisitorsGroup.LoginName
Create a new site group with specific permissions:
New-PnPSiteGroup -Name “Contributors Group” -PermissionLevels “Contribute”
Remove a user from a group:
Remove-PnPGroupMember -Group (Get-PnPGroup -AssociatedVisitorGroup).id -LoginName “dale.cooper@contoso.com”
These commands help you manage user roles well, making sure everyone has the right access to the resources they need.
Orchestrating End-to-End Provisioning
To make SharePoint site provisioning easy, you can use Site Scripts with Power Automate. This mix helps you automate the whole process well. Here’s how to set it up:
Using Power Automate
Create a SharePoint List: First, make a list with fields like Title, Description, State, URL, and Owner. This list will be the base for your site requests.
Create a Template: Set up a new page with the web parts you want in your new sites.
Create Power Automate Flow: Use the trigger ‘When an item is created’ to start the flow. Define string variables to get details from your SharePoint list.
Create a Site: Check if the site is available and send a POST request to create the site based on your template.
Update a Page: Change the Home Page layout using a POST request with the JSON data you got.
Publish a Page: Finish the process by publishing the changes to make the site live.
By following these steps, you automate site creation and make sure all needed settings are applied the same way. Power Automate helps you manage site provisioning better.
Scheduled Jobs
Scheduled jobs give you another way to automate SharePoint site provisioning. They let you run scripts at set times, keeping your sites updated and compliant. Here are some benefits of using scheduled jobs:
Using scheduled jobs can greatly improve your SharePoint management plan. They help keep things consistent and efficient in your organization.
Operating at Scale with SharePoint
When you use SharePoint on a large scale, managing your scripts is very important. Versioning and source control help keep things reliable and consistent. You can see changes, go back to older versions, and make sure your automation scripts work well. This practice stops confusion and makes updates easier.
Versioning & Source Control
Using versioning and source control for your SharePoint scripts is very important. Here are some main benefits:
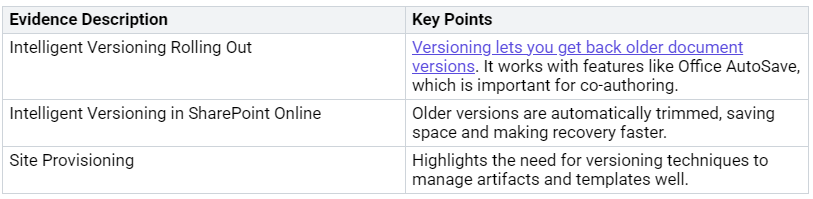
By using versioning, you can avoid problems like abandoned sites and unclear ownership. These issues often cause confusion and slow things down. You can also stop template sprawl by setting up governance policies. This helps control site creation and manage data retention better.
Monitoring Failures
Keeping an eye on failures in your SharePoint provisioning process is very important. You need to track errors to keep things running smoothly. Here are some common problems to look out for:
Unclear ownership leading to no responsibility.
Duplicate workspaces creating redundancy.
Different provisioning experiences hurting user satisfaction.
To fix these issues, think about using tools that offer good monitoring. A monitoring dashboard can show you health metrics and response times for your SharePoint environment. This helps you find bottlenecks and use resources better.
By using versioning, source control, and good monitoring, you can make sure your SharePoint site provisioning stays efficient and organized. This method helps you maintain governance and improves user experience across your organization.
Automating SharePoint site provisioning makes your work easier and keeps things the same in your organization. You learned to use Site Scripts for standard setups and PnP PowerShell for more complex tasks. Here are some important points to remember:
Use PnP PowerShell to manage site creation well.
Save site templates in XML format to use again.
Run the right commands to apply these templates on target sites.
To make your SharePoint experience better, think about making a template site with your lists and branding. Connect to your source site using Connect-PnPOnline and create a full XML template with Get-PnPProvisioningTemplate. This way, you can set up site columns, content types, and list definitions, making sure everything fits your needs.
By using these methods, you can stop site sprawl and keep control. Start automating your SharePoint site provisioning now!
FAQ
What is a SharePoint site template?
A SharePoint site template is a ready-made setup for a site. It has settings, lists, libraries, and other features. You can use it to make similar sites quickly.
How do I create a site template?
To create a site template, first set up your site with the features you want. Then, use the SharePoint interface or PowerShell commands to save it as a template for later use.
Can I apply a site template to existing sites?
Yes, you can use a site template on existing sites. This will update the site with the settings and features from the template, keeping everything the same.
What are the benefits of using site templates?
Using site templates saves time and keeps things the same across your SharePoint sites. They help keep branding, structure, and permissions right, which lowers mistakes when making sites.
How do I manage site templates in SharePoint?
You can manage site templates in the SharePoint admin center. Here, you can create, change, and delete templates as needed to keep your site setup organized.
