

In today’s quick software development world, you deal with problems from different setups and changing environments. These problems can slow you down and cause annoying errors. Making your development environments the same can help you get past these issues. By using tools like Dev Containers, you make a steady workspace that looks like production. This method not only makes your work easier but also improves teamwork among group members.
Key Takeaways
Dev Containers make development environments the same. This cuts down on mistakes from different setups.
Using Dev Containers helps new developers start quickly. They can begin working in minutes, not hours.
Making environments the same with Dev Containers can save 90% of setup time. It can also lower environment bugs by 80%.
Dev Containers help teamwork by giving everyone a shared space. This makes sharing code and solving problems easier.
Use best practices like predefined features and better Dockerfiles. This will improve your development experience.
Dev Containers Overview
Dev Containers are a strong tool. They help you make the same and repeatable development environments. They include all the tools, libraries, and settings you need for your project. This setup makes sure you can work in a similar environment, no matter the local machine setup. By using Dev Containers, you fix common problems from different setups. This includes issues like “it works on my machine” problems.
Key Features of Dev Containers
Several important parts define Dev Containers in today’s development workflows:
devcontainer.json: This is the main setup file. It tells the Docker image, runtime settings, environment variables, and VS Code extensions.
Dockerfile: This is an optional file. It lets you change the base Docker image more. You can use it to build the image when the container starts.
docker-compose.yml: This optional file sets up multi-container settings if your project needs more services.
These parts work together to create a smooth development experience. Here are some main benefits of using Dev Containers:
Container-Based Development: This method keeps things the same and repeatable on different machines.
Isolation and Portability: Dev Containers stop problems between projects and let you share settings easily.
Ease of Onboarding: New developers can start quickly by using ready-made settings.
The devcontainer.json file is very important for setting up and changing your Dev Containers. Here’s a look at its features:
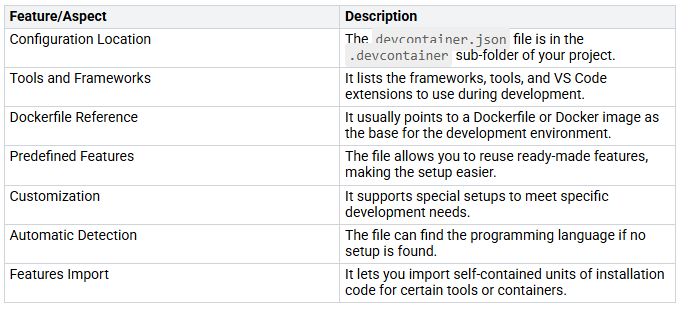
By using these features, you can create a standard development environment. This helps improve productivity and teamwork among group members.
Benefits of Standardizing Development Environments
Making development environments the same with Dev Containers has many benefits. You can have the same setup for all teams. This leads to smoother work and fewer mistakes. By using Dev Containers, you fix common problems that come from different setups. These problems happen when developers use different machines with different settings.
When you standardize your development environment, you create a complete setup that looks like production. This means applications work the same way everywhere. Because of this, you can avoid the annoying “it works on my machine” problem.
Consistency and Speed in CI/CD
Dev Containers make Continuous Integration and Continuous Deployment (CI/CD) faster and more reliable. With a steady development environment, you can cut down the time needed to set up and configure everything. Studies show that teams see a 90% reduction in setup time. New developers can start quickly in minutes instead of going through long installation steps. This fast onboarding means they don’t have to read through lots of documents about needed software.
Here are some clear improvements seen after standardizing development environments with Dev Containers:
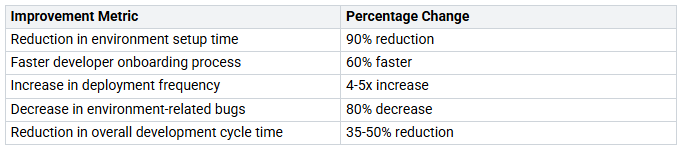
Using Dev Containers also helps team work and sharing knowledge. When everyone uses the same environment, sharing code and fixing problems is easier. You can expect a 40% reduction in support tickets about build environment issues. This lets your team focus on development instead of putting out fires.
Also, the separation of development environments from Dev Containers stops problems between projects. Each project can have its own needs without affecting others. This separation makes the development process more stable. It allows you to try new things safely without risking other projects.
Create Your First Devcontainer
Making your first devcontainer can be a fun step to standardize your development environment. Follow this easy guide to set up a basic development container for a Node.js application.
Prerequisites
Before you start, make sure you have these tools to run your dev container:
VS Code
Docker Desktop for Windows/Mac or Docker CE/CC for Linux
VS Code Remote Development Extension Pack
Step-by-Step Process
Install Application Dependencies: Start by installing Node.js and any other tools your application needs.
Create NodeJS Application Files: Set up your project layout and create the files for your Node.js application.
Write the Dockerfile: Make a Dockerfile that shows how your application will run in the container. This file should list the base image and any extra setup commands.
Create DockerHub Image Repository: If you want to share your image, make a repository on DockerHub to keep your Docker images.
Build the Docker Image: Use the Docker CLI to build your image from the Dockerfile. Run this command:
docker build -t your-image-name .
Run the Docker Container: Start your container with this command:
docker run -d -p 3000:3000 your-image-name
This command runs your application in the background and connects port 3000 of the container to port 3000 on your host.
Optimize for Production: Make sure to improve your Dockerfile for production by reducing the image size and following security best practices.
Push to a Container Registry: Finally, upload your image to the DockerHub repository using:
docker push your-image-name
Best Practices
To keep your devcontainer settings good over time, think about these best practices:
Make configuration easier by using features in VS Code to install needed tools instead of long Dockerfile steps.
Build the environment step by step, mixing Docker setup with manual steps and notes for clarity.
Use dev containers in CI/CD pipelines to make testing and deployment easier.
By following these steps, you can create your first devcontainer and enjoy a steady development environment. Dev Containers help teamwork among remote teams by giving them standardized and customizable environments that are easy to share. This reduces configuration problems and lets developers work well from different places.
Common Mistakes to Avoid
When setting up your devcontainer, watch out for these common mistakes:
Using the ‘latest’ tag in production can cause unexpected changes in the container version.
Running containers as root raises security risks if someone breaks into the container.
Not making
.dockerignorefiles can create larger images by including unwanted files in the build context.Using big, bloated base images can slow down downloads and deployments; smaller, purpose-built images are better.
Ignoring Dockerfile layer optimization can lead to slow builds and larger images.
By avoiding these mistakes, you can have a smoother experience with your development containers.
Best Practices for Using Dev Containers
Using Dev Containers well can make your development experience much better. Here are some tips to think about:
Customization: Change your Dev Containers to fit your project’s needs. Use Dev Container Features to add tools and improve functionality.
Repeatability and Consistency: Keep all settings in one file. This helps make builds the same and cuts down on unexpected problems.
Integration with CI/CD Pipelines: Automate testing and deployment. This saves time and effort when adding new features or fixes.
Use of Predefined Features: Quickly add tools and services without doing it by hand. This speeds up development and cuts setup time.
Standardized Base Image: Agree on core technologies. This makes customization easier and lowers compatibility issues.
Remote Development Tools: Use Visual Studio Code’s tools for better management. These tools help keep the development process organized.
Cloud-Native Development Focus: Keep your code in the same environment all the time. This helps with cloud deployment.
Security Considerations: When using Dev Containers, watch out for security risks. Here are some common problems and how to fix them:
Vulnerabilities in container runtimes: Make sure to secure container images and handle secrets well.
Insufficient network security: Set up strong network controls to stop unauthorized access.
Weak authentication and authorization: Use centralized access management to keep your applications safe.
Unsecured APIs: Protect your APIs to stop interception of communications.
Lack of visibility: Regularly check dependencies to find possible vulnerabilities.
To improve security, follow these tips:
Remove unneeded software packages from images.
Regularly scan container images for vulnerabilities.
Use secret rotation and auditing policies.
Use runtime security tools to watch container activity.
By following these best practices, you can build a safe and efficient development environment that helps your team be more productive.
In short, Dev Containers change how you develop software. They offer:
Consistency: You stop ‘it works on my machine’ problems.
Isolation: Each project works in its own space, avoiding issues.
Reproducibility: You can easily copy environments on different systems.
Portability: Applications work on any system that uses Docker.
Resource Efficiency: They need less power than regular VMs.
Dependency Management: Managing dependencies is easier.
Rapid Development and Testing: You can quickly test and make changes.
Version Control: You can keep track of changes in environments with your code.
As you start using Dev Containers, remember to keep them safe. Pay attention to known security issues and setup problems. Simple steps, like updating base images and using non-root users, can greatly improve security.
Looking forward, expect more new ideas in container technology. Kubernetes will be key for managing containers. Cloud-native ideas will become more popular. Combining AI/ML with containers will open new doors, making your work even smoother.
Embrace these changes to stay ahead in your development journey! 🚀
FAQ
What are Dev Containers?
Dev Containers are special setups for development. They include all the tools, libraries, and settings you need. This helps keep things the same on different computers. It makes it easier for developers to work together without problems from different setups.
How do I create a devcontainer.json file?
To create a devcontainer.json file, put it in the .devcontainer folder of your project. This file tells what Docker image to use, how to run it, and which VS Code extensions you need for your work.
Can I use Dev Containers for multiple projects?
Yes, you can use Dev Containers for many projects. Each project can have its own devcontainer.json file. This lets you change the setup based on what each project needs without messing up others.
Are there any security concerns with Dev Containers?
Yes, security matters when using Dev Containers. You should protect container images, handle secrets carefully, and check for problems often to keep your development environment safe.
How do Dev Containers improve onboarding for new developers?
Dev Containers make it easier for new developers to start working. They provide a steady environment. New developers can quickly copy repositories and begin working without long setup times. This helps them become productive faster.
